Overview
SSW EagleEye is an AI-powered email management solution that helps organizations categorize and process emails automatically using Azure OpenAI. This guide will walk you through the installation process from Azure Marketplace.
🚨 Note: Only proceed with the installation after completing all steps in the Prerequisites guide.
Installation Process
Phase 1: Deploy from Azure Marketplace
Step 1: Get SSW EagleEye in Marketplace on Azure Portal
- Go to your Azure Portal
- Search for Marketplace in the search bar

- In the Marketplace, search for SSW EagleEye

- Select your subscription and click Create

Step 2: Configure Application Settings
Follow the deployment wizard with these configuration steps:
2.1 Basics
- Resource Group: Select an existing resource group or create a new one
- Region: Choose your preferred Azure region
- Application Name: Enter a unique name for your application

2.2 Application Configuration
- Project Name: Unique prefix for all resources
- Environment: Select
productionorstaging

2.3 Azure AD Configuration
- Azure Tenant ID: Your Azure AD tenant ID
- Azure Group Name: Enter the Azure AD group name for email processing

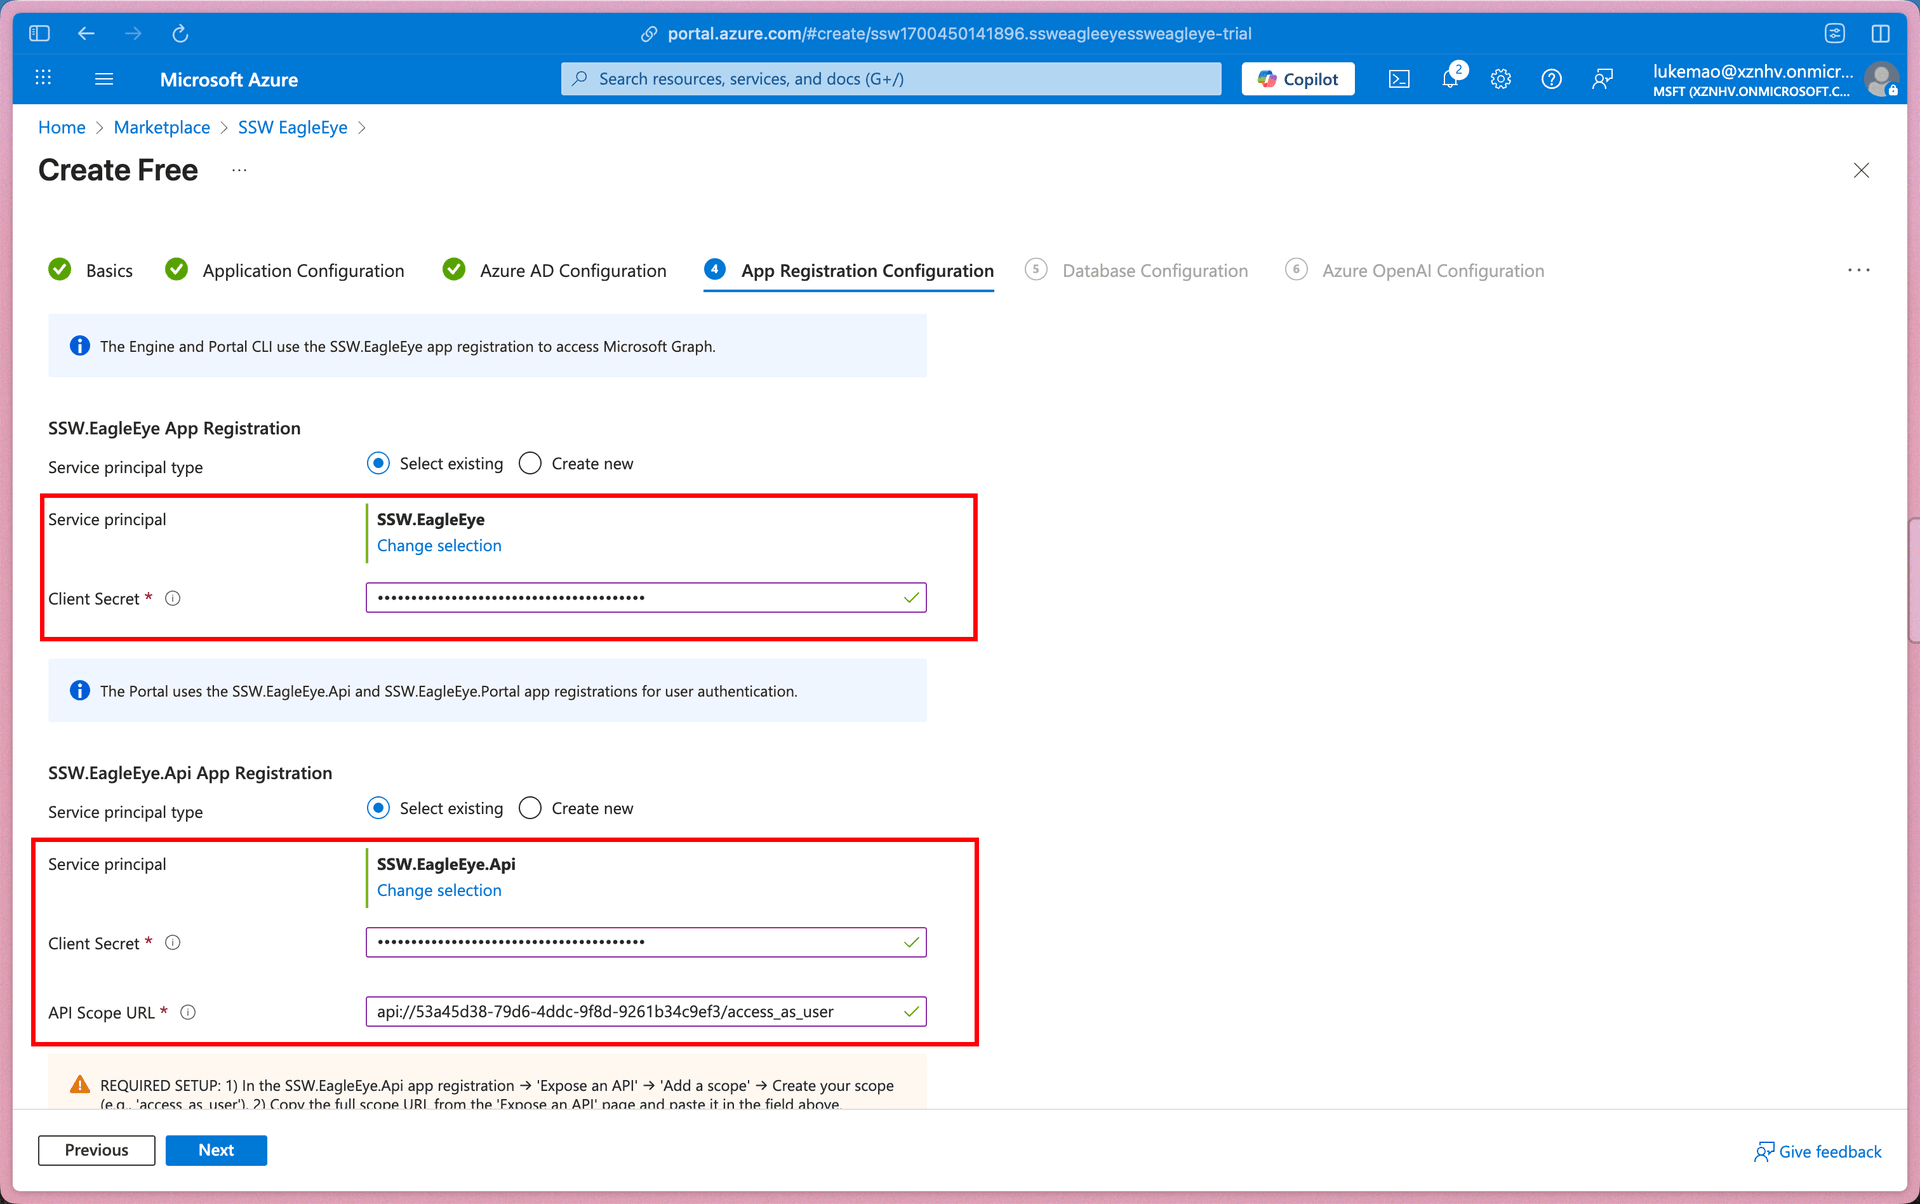
2.4 App Registration Configuration
You need to provide details for the 3 app registrations created in the Prerequisites section:
- SSW.EagleEye.Engine App Registration: Select the Engine app registration and enter the client secret
- SSW.EagleEye.Api App Registration: Select the API app registration and enter the client secret
- API Scope URL: Enter the full scope URL from the API app registration
- SSW.EagleEye.Portal App Registration: Select the Portal app registration and enter the client secret

2.5 Database Configuration
- Database Pricing Tier: Select appropriate tier (Basic, S0, S1, S2)
- Database Users: Configure three database users:
- Admin user (full access)
- ReadWrite user (read/write access)
- ReadOnly user (read-only access)

2.6 Azure OpenAI Configuration
- Location: Select Azure region (currently East US)
- Model: Choose GPT-4.1 Mini or GPT-4o Mini
- Capacity: Set tokens per minute. You can view and requst quotas in Foundary portal

Step 3: Review and Deploy
- Review all configuration settings
- Click Create to start deployment
- Monitor deployment progress in the Azure Portal
- Deployment typically takes 15-30 minutes
Phase 2: Post-Deployment Configuration
Step 4: Configure Portal Frontend Redirect URL
After deployment completes, you need to configure the authentication redirect URL:
- Go to Resource Groups > [your-resource-group] > Container Apps
- Find the Portal container app (e.g.,
ca-nextjs-xxxxxx) - Copy the Application URL (e.g.,
https://ca-nextjs-4d33i5xxemxsu.happyfield-d167da8e.australiaeast.azurecontainerapps.io) - Go to Azure AD > App registrations > SSW.EagleEye.Portal
- Go to Authentication > Add a platform > Web
- Add redirect URI:
[Application URL]/api/auth/callback/azure-ad- Example:
https://ca-nextjs-4d33i5xxemxsu.happyfield-d167da8e.australiaeast.azurecontainerapps.io/api/auth/callback/azure-ad
- Example:
- Click Save
Step 5: Verify Deployment
- Access the Portal: Navigate to the Portal container app URL
- Test Authentication: Sign in with your Azure AD credentials
- Check API Connectivity: Verify the Portal can communicate with the API
- Test Email Processing: Run a manual job to categorize emails
Architecture Overview
The deployed solution includes:
- Container Apps Environment: Hosting the API, CLI, and Portal
- Azure SQL Database: Data storage with configured user access
- Azure OpenAI: AI processing for email categorization
- Key Vault: Secure storage of secrets and configurations
- Application Insights: Monitoring and telemetry
- Container Registry: Docker image storage
Next Steps
After successful deployment:
- Configure Email Tags
- Integrate Power BI report